 4 minutes read
Slicing and Cura
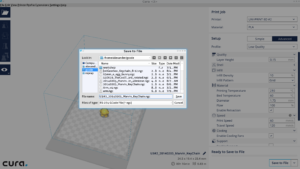
The process of creating program code (GCode), which are used as input for 3D printers, from 3D object files (STL) is called slicing, because the object is basically sliced into many very thin layers.
Cura is an open source slicing software supported by Ultimaker for their 3d printers. Besides the official version from Ultimaker, many other 3d printer manufacturers support Cura as slicing software. The lasted version of Cura is based on Python and Qt5/QML, which makes it a perfect match for integration with Machinekit and QtQuickVcp. Throughout this article, I use Cura version 2.3.1.
What I used before
Until recently I have used Slic3r as my main CAM/slicing software for 3d printing. This required a few modifications to the Slic3r source code, since Machinekit uses RS274-NGC flavor GCode compared to RepRap/Marling flavor GCode used by most 3d printers. This is especially important since I use Machinekit with velocity extrusion support. However, since the modifications to Slic3r are not going to be merged upstream, I started to look for a suitable alternative.
Adding a new GCode flavor to Cura
It turned out that it is not very hard to add support for new GCode flavors to Cura using plugins, written in Python. To add a new plugin it is best to start off by forking an existing Cura plugin, in my case the X3GWriter plugin. The resulting NGCWriter plugin can be found on Github.
Let's take a look at the __init__.py file of the plugin:
from . import NGCWriter

from UM.i18n import i18nCatalog
catalog = i18nCatalog("cura")


def getMetaData():
    return {
        "plugin": {
            "name": catalog.i18nc("@label", "NGC Writer"),
            "author": "Machine Koder",
            "version": "1.0",
            "description": catalog.i18nc("NGC Writer Plugin Description", "Writes RS-274 GCode to a file"),
            "api": 3
        },

        "mesh_writer": {
            "output": [{
                "extension": "ngc",
                "description": catalog.i18nc("@item:inlistbox", "RS-274 GCode File"),
                "mime_type": "text/x-ngc",
                "mode": NGCWriter.NGCWriter.OutputMode.TextMode
            }]
        }
    }


def register(app):
    return {"mesh_writer": NGCWriter.NGCWriter()}
We see that the plugin registers as "mesh_writer" which allows us to post-process the GCode generated by Cura. The MIME type text/x-ngc tells Cura to use this output plugin whenever a .ngc file needs to be generated.
In the NGCWriter.py module a class inheriting from MeshWriter is used:
class NGCWriter(MeshWriter):
    version = 3

    def __init__(self):
        super().__init__()

    def write(self, stream, node, mode=MeshWriter.OutputMode.TextMode):
        if mode != MeshWriter.OutputMode.TextMode:
            Logger.log("e", "NGC Writer does not support non-text mode.")
            return False

        #Get the g-code.
        scene = Application.getInstance().getController().getScene()
        gcode_list = getattr(scene, "gcode_list")
        if gcode_list:
            gcodeConverter = GCode2Ngc()
            veConverter = Ngc2Ve()
            gcodeConverter.process(gcode_list)
            veConverter.process(gcode_list)

            for gcode in gcode_list:
                stream.write(gcode)

            return True

        return False
The RepRap flavor GCode can be accessed layer by layer (not line by line) as a list. This list is then passed to our to post processors. GCode2Ngc converts the RepRap flavor GCode to Machinekit compatible RS274-NGC GCode. The second post-processor Ngc2Ve applies modifications for velocity extrusion support. I will not go into details about the post processors in this post. However, feel free to check out the source code on Github
To install the plugin, we just need to copy the complete folder (which is a Python module) to /lib/cura/plugins/. The plugin loads automatically at the next start of Cura.
Adding a new 3D printer to Cura
To use the newly created output plugin, we have to add a new 3D printer configuration to Cura. Again it is easiest to start off with an existing configuration which can be found in /share/cura/resources/definitions/.
Here is the configuration I created for the UNI-PRINT-3D machine:
{
    "id": "uni_print_3d",
    "name": "UNI-PRINT-3D",
    "version": 2,
    "inherits": "fdmprinter",
    "metadata":
    {
        "visible": true,
        "author": "Alexander Rössler",
        "category": "TheCoolTool",
        "manufacturer": "TheCoolTool",
        "file_formats": "text/x-ngc;text/x-gcode",
        "platform": "uni_print_3d_platform.stl",
        "platform_offset": [0, 0, 0]
    },

    "overrides": {
        "machine_name": { "default_value": "UNI-PRINT-3D" },
        "machine_heated_bed": { "default_value": true },
        "machine_width": { "default_value": 186 },
        "machine_height": { "default_value": 230 },
        "machine_depth": { "default_value": 220 },
        "machine_center_is_zero": { "default_value": true },
        "machine_nozzle_size": { "default_value": 0.4 },
        "material_diameter": { "default_value": 1.75 },
        "machine_nozzle_heat_up_speed": { "default_value": 2.0 },
        "machine_nozzle_cool_down_speed": { "default_value": 2.0 },
        "machine_head_shape_min_x": { "default_value": 75 },
        "machine_head_shape_min_y": { "default_value": 18 },
        "machine_head_shape_max_x": { "default_value": 18 },
        "machine_head_shape_max_y": { "default_value": 35 },
        "machine_nozzle_gantry_distance": { "default_value": 55 },
        "machine_gcode_flavor": { "default_value": "RepRap (Marlin/Sprinter)" },

        "machine_start_gcode": {
            "default_value": "M53; enable feed-hold\nG0 Z2.0; always start from the same height to compensate backlash\nG28; move extruder to 0\nM420 R0.0 E0.0 D0.0 P0.1 ; turn the lights on\nM107; turn off fan\nG64 P0.05 Q0.05; path blending settings\nG23; unretract"
        },
        "machine_end_gcode": {
            "default_value": "M104 P0 ; turn off hotend\nG0 X-80 Y100; move the extruder out of the way\nM420 R0.0 E0.1 D0.0 P0.6 ; signalize end of print\nM140 P0 ; turn off heatbed\nM65 P16 ; turn off external fan\nM65 P15 ; turn off power"
        }
    }
}
Most of the values in the JSON file should be straightforward if you are familiar with 3D printing. The most important line to mention is "file_formats": "text/x-ngc;text/x-gcode", which enables the use of the NGCWriter plugin.
To add a new 3d printer platform to Cura (see "platform": "uni_print_3d_platform.stl",) we have to add a new mesh aka. STL file to /share/cura/resources/meshes/. To model a new platform my 3d printer I used the CAD software OpenSCAD. Basically I created a simple cube with the size of my build platform:
w = 190;
d = 280;
th = 5;

translate([-w/2,-d/2,-th]) cube([w,d,th]);
After rendering the cube (F6) we can export the STL file from the menu of the OpenSCAD GUI. The newly generated STL file needs to be placed in /share/cura/resources/meshes/ and we are all set.
Wrapping up
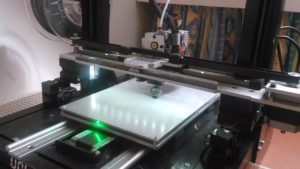
The complete code of the Cura plugin and 3d printer configuration can be found on Github: machinekoder/uni-print-3d-cura. I have already used Cura for several successful prints. So far, I am very satisfied with the slicing quality. Compared to Slic3r I noticed that the Cura generated GCode is more consistent when it comes to the diameter of the extruded material, which in theory, should result in better printing quality.
I hope the provided information is useful. More posts about 3D printing will follow soon, so please stay tuned and subscribe. Any feedback is welcome.
If you want to learn more about 3D printing, check out the Begginers Guide to 3D Printing.