 5 minutes read
This blog post is about getting started with Machinekit on the Nexthing CHIP.
With a price of 9$; the CHIP is the cheapest single board computer with wifi and flash memory on the market. The low price and easy availability make the CHIP an ideal platform for low-budget motion-control applications.
This blog post focuses on the user perspective of using Machinekit on the CHIP. If you are also interested in how the CHIP GPIO driver works please take a look the earlier blog post.
Why using Machinekit?
Machinekit is a machine control software platform. It is available across a wide range of hardware platforms and real-time environments and delivers excellent performance at low cost.
One key feature of Machinekit is the HAL component architecture, an easy to use circuit model that includes over 150 building blocks for digital logic, motion, control loops, signal processing, and hardware drivers.
Machinekit makes it easy to build real-time Linux applications. Choosing real-time Linux as platform for your project you can use the full spectrum of open source software and at the same time build hard real-time motion control applications.
Machinekit supports local and networked UI options, including mobile platforms like phones or tablets.
Machinekit is open source and has an active and inspiring community which is eager to help newcomers.
Summarized, if you want to use your CHIP to interface with the real world, you should consider using Machinekit.
Setup the CHIP for Machinekit
In this tutorial, I assume you are using the CHIP in a headless setup. Headless means the CHIP is connected to your computer via a (USB) serial terminal or SSH. For more details, please take a look at the CHIP documentation.
First of all, you need to flash the 4.4 Debian image on your CHIP using the Online Flasher. I used the Headless 4.4 image.
If your CHIP is already connected to the internet, you can skip ahead to the installation section.
Connect to WiFi
First of all, you need to connect to your CHIP to the web. To achieve this you have to connect the CHIP to a WiFi network.
First, list the available networks.
nmcli device wifi list
You should see a list of available networks.
*  SSID      MODE   CHAN  RATE       SIGNAL  BARS  SECURITY
*  NextThing HQ    Infra  11    54 Mbit/s  100     ????  --
   NextThing Shop  Infra  6     54 Mbit/s  30      ?___  WPA1 WPA2
   2WIRE533        Infra  10    54 Mbit/s  44      ??__  WPA1 WPA2
Next, connect a network. Without password:
sudo nmcli device wifi connect '(your wifi network name/SSID)' ifname wlan0
Or with password:
sudo nmcli device wifi connect '(your wifi network name/SSID)' password '(your wifi password)' ifname wlan0
For more info about the CHIP and WiFi please take a look at the docs.
Once connected you are ready to install Machinekit.
Install Machinekit packages and RT-PREEMPT kernel
Installing Machinekit on the CHIP is as easy as executing the following line:
curl -sSL http://bit.ly/2cyf0At | sudo -E bash -
Behind this link, you can find an install script located on GitHub in this repository.
This script will download and install Machinekit and an RT-PREEMPT kernel for the CHIP 4.4 images. If you run the script on the PocketCHIP it will install the POSIX-thread flavor of Machinekit.
Caution: During the installation, the script will download a few hundred megabytes of data.
Furthermore, the installation will take some time and automatically reboot your CHIP.
Testing Machinekit
Now it is time to download and run the first Machinekit configuration.
First, install git:
sudo apt install git
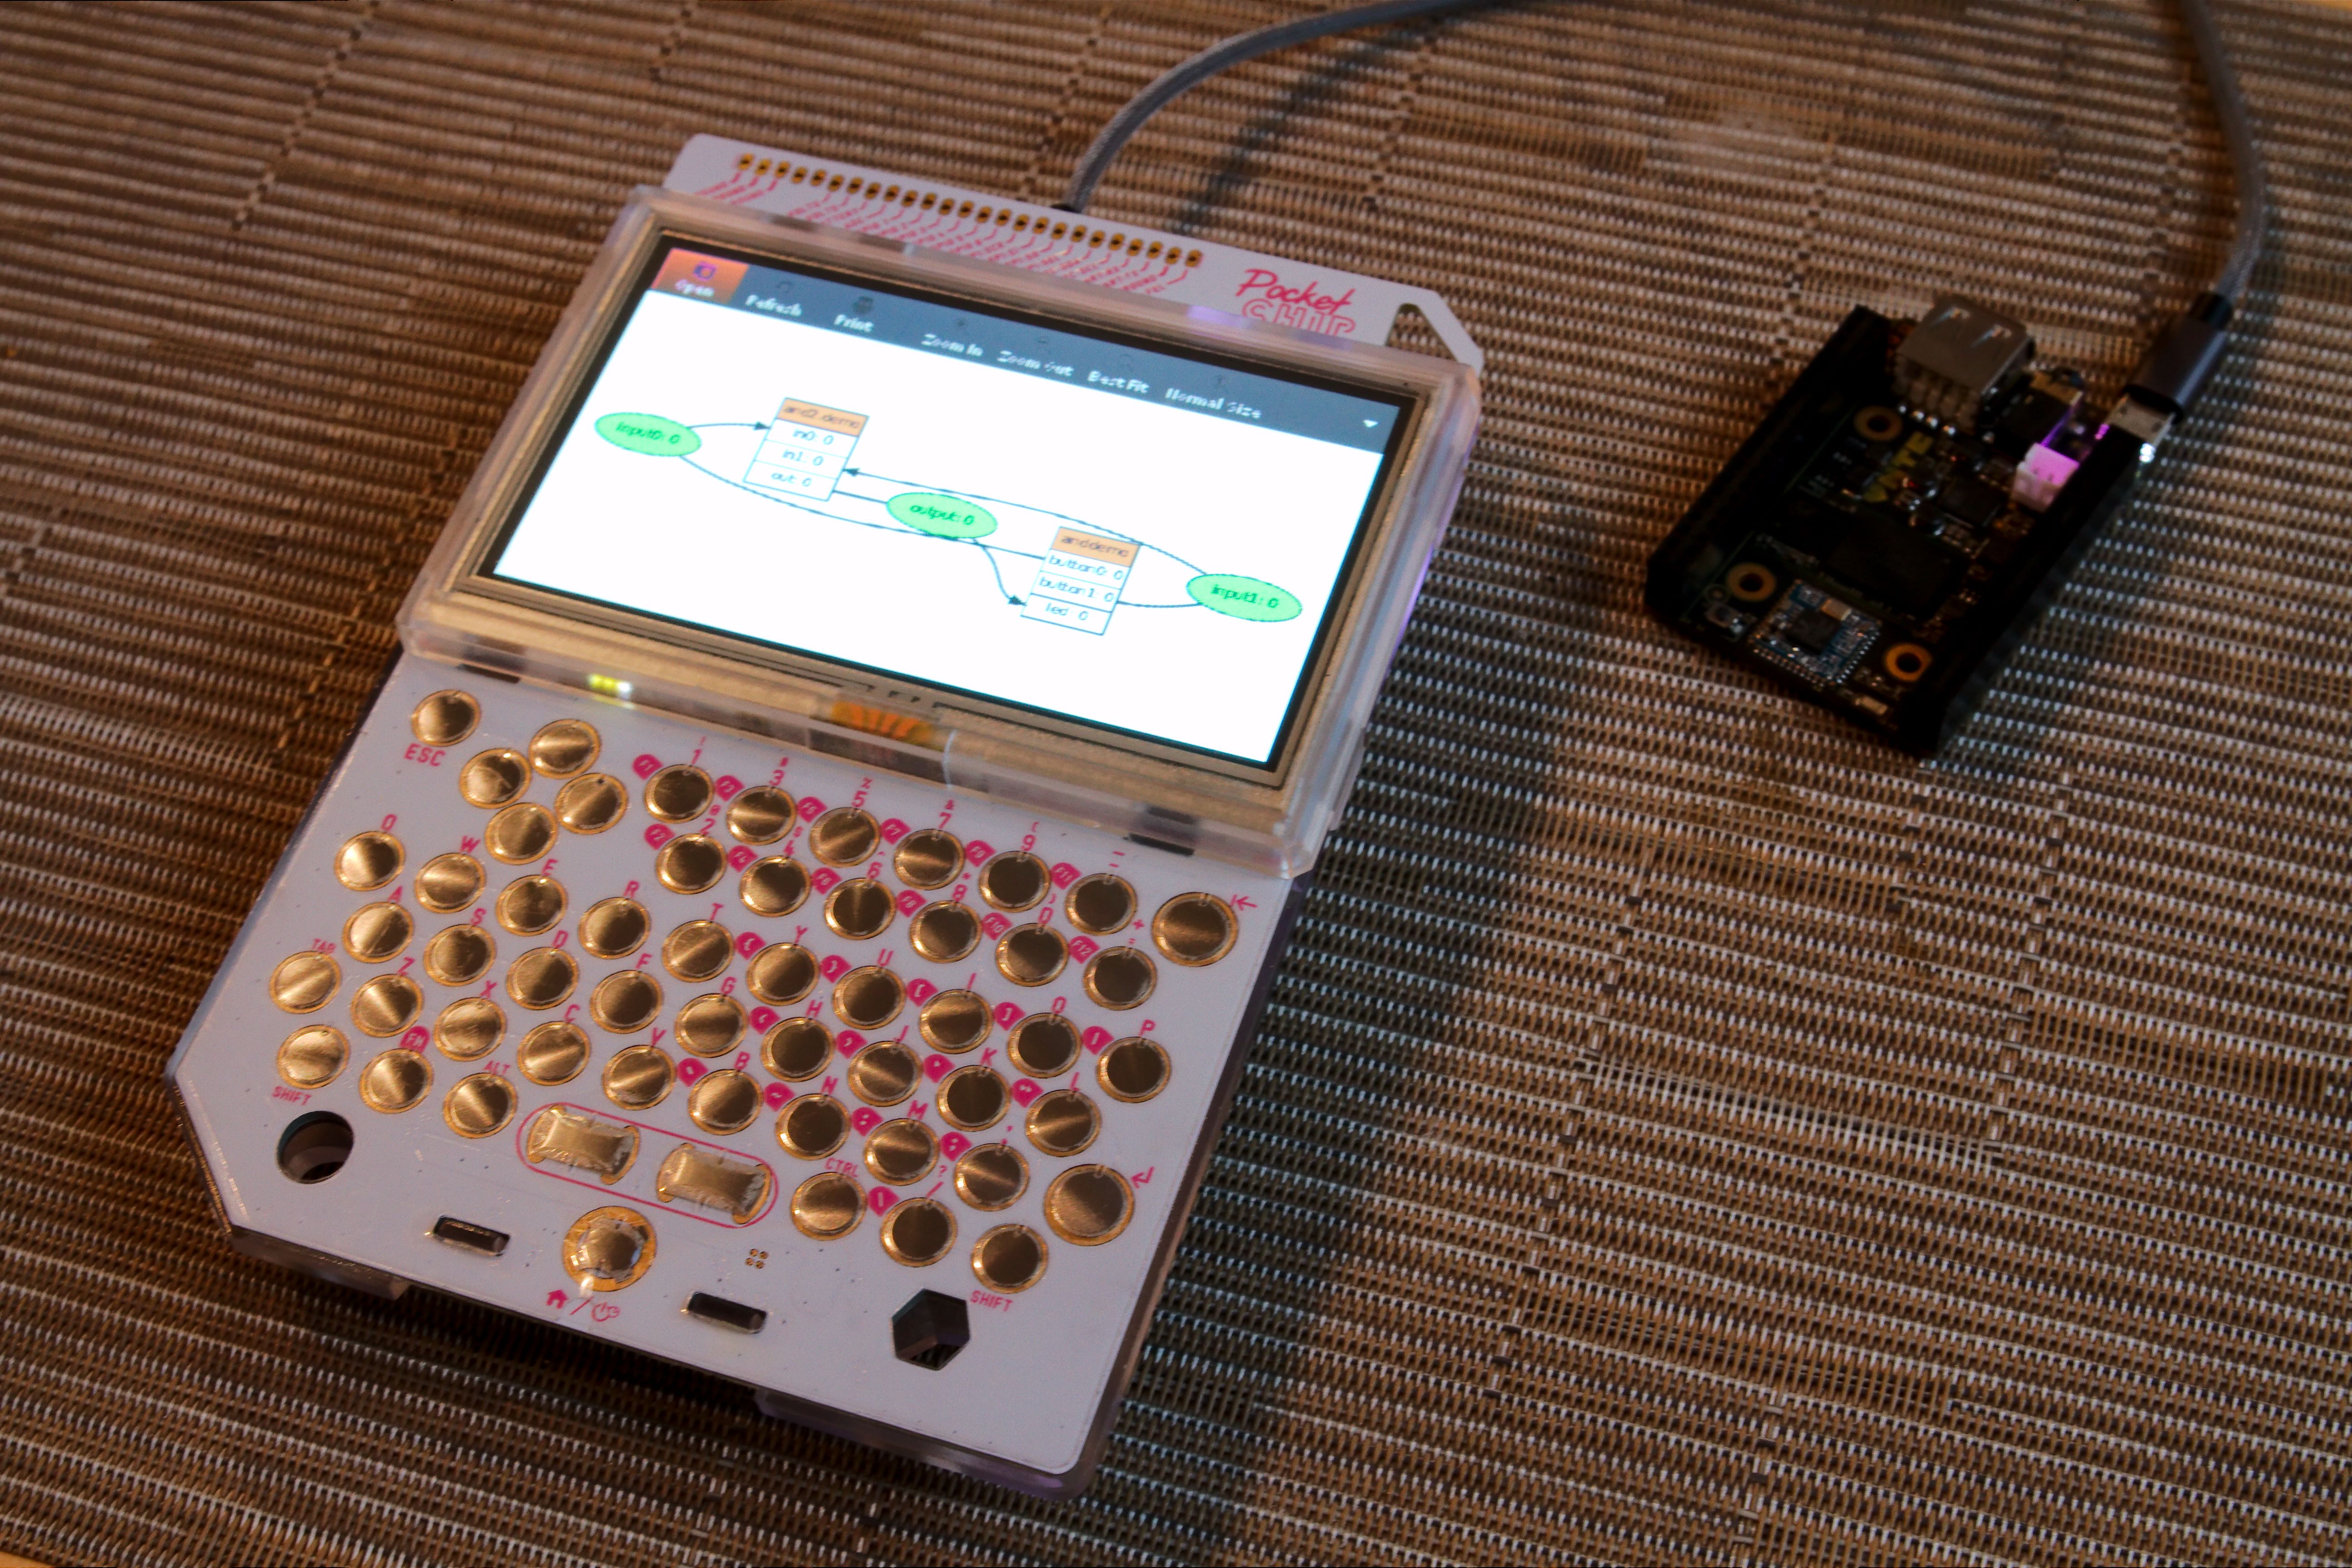
Then, clone the hal_hello_chip configuration and execute the run.py:
cd
mkdir repos
cd repos
git clone https://github.com/machinekoder/hal_hello_chip
cd hal_hello_chip
./run.py &
Now you should have a running Machinekit instance. To verify your setup is working run:
halcmd show pin
You should see something similar to this:
Component Pins:
  Comp   Inst Type  Dir         Value  Name                                             Epsilon         Flags
    73        bit   OUT         FALSE  chip_gpio.in-04                                                  0
    73        bit   IN          FALSE  chip_gpio.in-04.invert                                           0
    73        bit   OUT         FALSE  chip_gpio.in-05                                                  0
    73        bit   IN          FALSE  chip_gpio.in-05.invert                                           0
    73        bit   OUT         FALSE  chip_gpio.in-06                                                  0
    73        bit   IN          FALSE  chip_gpio.in-06.invert                                           0
    73        bit   OUT         FALSE  chip_gpio.in-07                                                  0
    73        bit   IN          FALSE  chip_gpio.in-07.invert                                           0
    73        bit   IN          FALSE  chip_gpio.out-00                                                 0 <== square
    73        bit   IN          FALSE  chip_gpio.out-00.invert                                          0
    73        bit   IN          FALSE  chip_gpio.out-01                                                 0
    73        bit   IN          FALSE  chip_gpio.out-01.invert                                          0
    73        bit   IN          FALSE  chip_gpio.out-02                                                 0
    73        bit   IN          FALSE  chip_gpio.out-02.invert                                          0
    73        bit   IN          FALSE  chip_gpio.out-03                                                 0
    73        bit   IN          FALSE  chip_gpio.out-03.invert                                          0
    73        s32   OUT          3625  chip_gpio.read.time                                              0
    73        s32   OUT          3875  chip_gpio.write.time                                             0
   102        float IN              1  siggen.0.amplitude                               0.000010        0
   102        bit   OUT         FALSE  siggen.0.clock                                                   0 ==> square
   102        float OUT    -0.9921147  siggen.0.cosine                                  0.000010        0
   102        float IN             10  siggen.0.frequency                               0.000010        0
   102        float IN              0  siggen.0.offset                                  0.000010        0
   102        float OUT         -0.04  siggen.0.sawtooth                                0.000010        0
   102        float OUT     0.1253332  siggen.0.sine                                    0.000010        0
   102        float OUT             1  siggen.0.square                                  0.000010        0
   102        float OUT         -0.88  siggen.0.triangle                                0.000010        0
   102        s32   OUT          7958  siggen.0.update.time                                             0
Congratulations, the installation is complete! Now you are ready to use Machinekit
CHIP GPIO
A core part of Machinekit platform support is a HAL GPIO driver. I have presented a HAL GPIO driver in an earlier blog post.
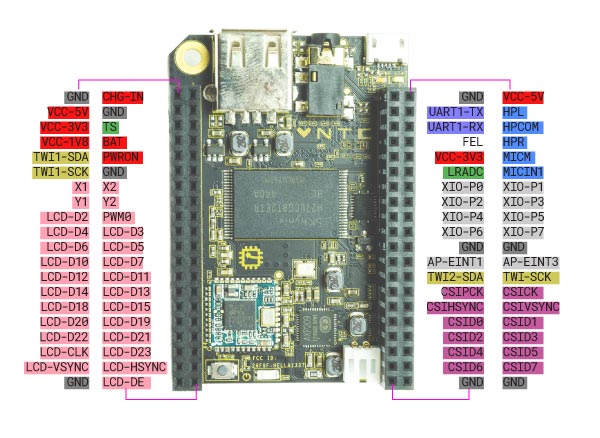
The hal_chip_gpio component controls the CSIDn pins rather than the XIO-Pn pins for performance reasons.
You can use the driver in a HAL configuration using the following command:
rt.loadrt('hal_chip_gpio', output_pins='0,1,2,3', input_pins='4,5,6,7')
The output_pins parameter determines which pins to use as output. The input_pins determines which pins to use as input.
You can connect these pins for example to software PWM or stepper generators. I also tested the software encoder component with the CHIP.
During my first tests with the CHIP, I observed that the performance is good enough to for most basic motion control applications.
Setup USB OTG networking
I found it useful to have a non-wireless connection with the CHIP. If you want to use USB networking on your CHIP, you can use the following commands.
sudo editor /etc/network/interfaces.d/usb0
And insert
auto usb0
iface usb0 inet static
address 192.168.7.1
netmask 255.255.255.0
Start the network by running:
sudo ifup usb0
On your host computer, you have to manually configure the network adapter to use the static IPv4 address 192.168.7.2 and netmask 255.255.255.0.
How to continue
Now it is time for you to explore Machinekit. The best place to start with learning Machinekit is the Machinekit documentation.
Just type the topic you are interested in into the search bar.
Note: a lot of the documentation is still using the old style .hal files and syntax. However, I recommend you using the newer Python API.
I know that the learning curve for Machinekit might seem very steep in the first place. But you will soon see that learning to use Machinekit pays off.
Please stay tuned for more beginner blog posts on this blog. I will dedicate some future blog posts on practical examples using Machinekit and the CHIP.
Summary
In this blog post, you learned how to install Machinekit on the CHIP.
Furthermore, the article explains how to configure different types of networking on the CHIP. Moreover, the post introduces an short example HAL configuration and the CHIP GPIO HAL component.
I hope you found this article useful, and I'm looking forward to your feedback.
Your
Machine Koder