 4 minutes read
Rendering to a monochrome OLED display with QML
In this blog post, you will learn how to write QtQuick applications for an OLED display without modifying the Linux kernel.
My testing system is an SSD1306 based 128x64 monochrome OLED display connected via I2C to the CHIP single board computer.
Motivation
I recently came across a post on the Qt Blog about "Making Movies with QML". The author of this blog article describes how to render a QML application into a short movie. For this purpose, the application uses offscreen rendering. It quickly came to my mind that this could also be useful to render to something which I would not consider a standard desktop display.
At the same time, I'm currently working on a project which involves creating an UI for a monochrome OLED display with Gtkmm. Since I'm not a huge fan of Gtk, I thought about creating a demo project for doing something similar with QtQuick.
I also had two SSD1309-based monochrome OLED displays sitting around waiting to be used in a project. The small OLED displays are super cheap (1-2$ each) and very easy to connect. A perfect fit for machine control applications with the CHIP.
Userspace I2C display driver
One of the components of the QML OLED renderer is the driver for the SSD1306 display.
Thanks to the popularity of the OLED display module it was necessary for me to write a new driver. I tested a few different implementations and ended up using the userspace driver by dword1511.
The driver utilizes the Linux i2c-dev file system driver. Thanks to the nature of a userspace driver we do not need to modify the kernel to install the QML OLED renderer given the i2c-dev kernel module is already installed.
On the CHIP Debian Linux installation, I just needed to run sudo modprobe i2c-dev to load the driver. Installation on the BBB should be similar.
The CLI application
The qml-oled-render application is strongly based on the qml-movie-renderer.
The complete source code and instructions on how to use the application can be found on GitHub.
Overview
The following diagrams show the (very simple) architecture of the application:

The first diagram shows the system context. The CLI application is intended to be used by the developer as a tool to render QML applications to the OLED screen.

The second diagram shows the components of the QML OLED renderer.
To be noted as this point should be that I tried to follow the C4 method for describing software architecture by Simon Brown.
Some implementation details
I stripped away the GUI part of the application and added a CLI instead.
QCommandLineParser parser;
parser.setApplicationDescription("Renders QML applications to a SSD1306 OLED display");
parser.addHelpOption();
parser.addPositionalArgument("source", "QML source file");
parser.addOptions({
                      {{"w", "width"}, "OLED screen width", "weight"},
                      {{"h", "height"}, "OLED screen height", "height"},
                      {{"b", "bus"}, "I2C bus to which the OLED is connected", "bus"},
                      {{"a", "address"}, "I2C address of the OLED screen", "address"},
                      {{"f", "fps"}, "Number of frames to render per second", "fps"}
                  });

parser.process(app);
Furthermore, I exchanged the best effort rendering approach of the example by a time triggered rendering. Using the timer as a trigger for the frame rendering process, we can ensure that the QML application generates exactly x frames per seconds.
// Start the renderer
m_renderTimer = new QTimer;
m_renderTimer->setInterval(renderInterval);
connect(m_renderTimer, &QTimer::timeout, this, &OledRenderer::renderNext);
m_renderTimer->start();
renderNext();
As preparation for the rendered QImage, it is necessary to convert the image to monochrome colors before sending it to the OLED display. Qt provides several dithering-based approaches and a fast threshold-based method. I chose to use the threshold-based conversion since this delivered the best results in my test application.
OledRenderer renderer;
QObject::connect(&renderer, &OledRenderer::imageRendered, [&driver](const QImage &image) {
    const auto mono = image.convertToFormat(QImage::Format_Mono, Qt::MonoOnly | Qt::ThresholdDither);
    driver.writeImage(mono);
});
Testing and Rendering Performance
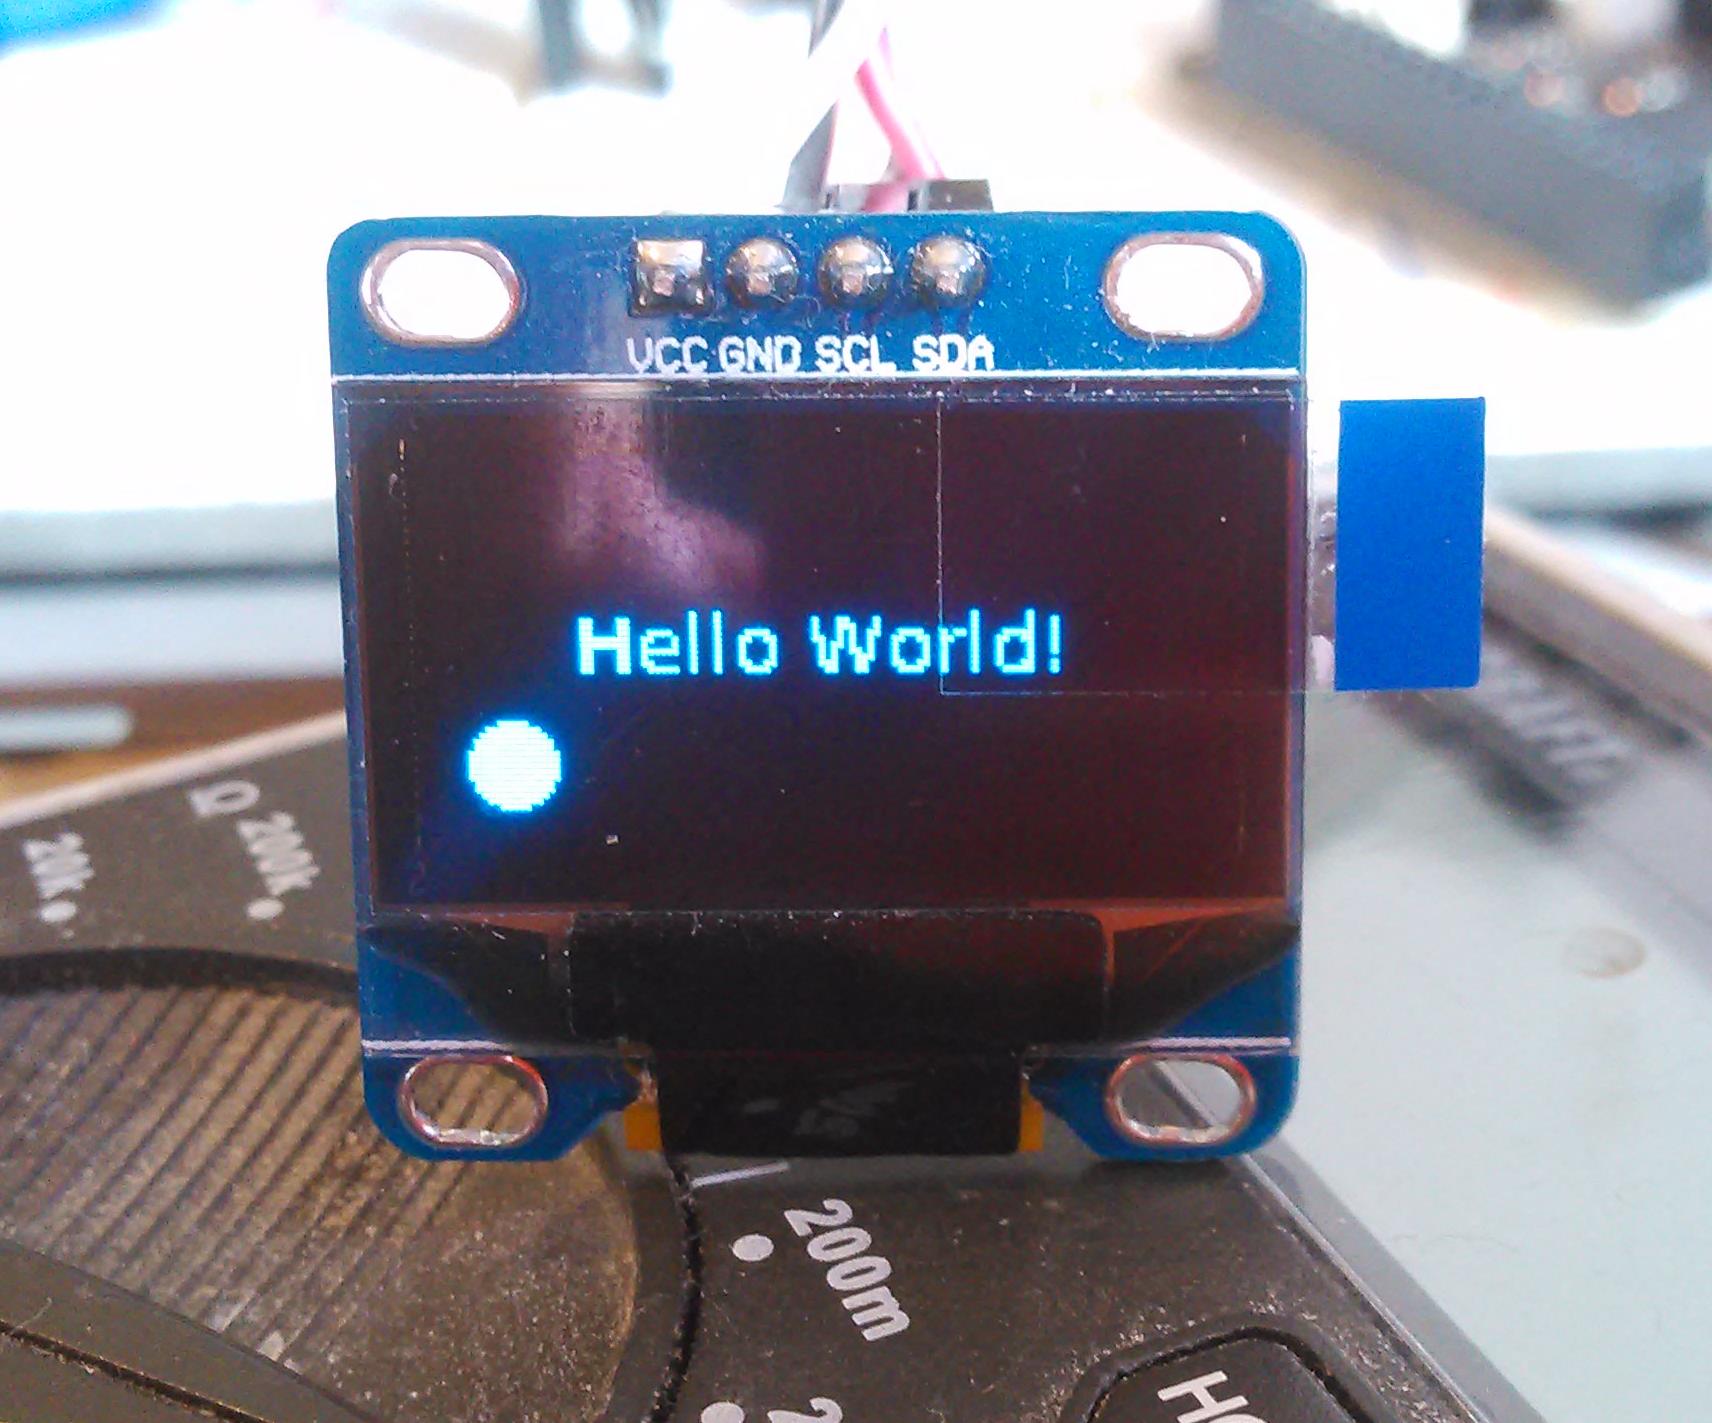
I tested the application with the following hello world QML UI:
import QtQuick 2.6

Item {
    id: root
    visible: true
    width: 128
    height: 64

    Rectangle {
        property bool isRight: false

        id: indicator
        anchors.bottom: parent.bottom
        anchors.bottomMargin: 5
        x: (isRight ? 5 : (root.width - width) - 5)
        width: 15
        height: width
        radius: width / 2
        color: "black"

        Behavior on x {
            PropertyAnimation {
                duration: 500
            }
        }

        Timer {
            id: moveTimer
            running: true
            repeat: true
            interval: 500
            onTriggered: indicator.isRight = !indicator.isRight
        }
    }

    Text {
        anchors.centerIn: parent
        text: "Hello World!"
    }
}
The QML application features a text element, a rectangle, and an animation as can be seen in the next image.

With a framerate of 10 frames per seconds and the xcb Qt platform plugin, I measured around 5% CPU utilization on the CHIP mini computer. Considering that not native OpenGL platform plugin was used, I consider as an acceptable performance.
I also tested the QML OLED renderer with a small QtQuickVCp application.
import QtQuick 2.6
import Machinekit.HalRemote 1.0
import Machinekit.HalRemote.Controls 1.0

HalApplicationWindow {
    id: root
    width: 128
    height: 64
    name: "motor-control"

    Rectangle {
        property bool isRight: false

        id: indicator
        anchors.bottom: parent.bottom
        anchors.bottomMargin: 5
        x: (isRight ? 2 : (root.width - width) - 2)
        width: 10
        height: width
        radius: width / 2
        color: "black"

    }

    HalPin {
        id: cmdVelPin
        name: "cmd-vel"
        type: HalPin.Float
        direction: HalPin.IO
    }

    HalPin {
        id: fbVelPin
        name: "fb-vel"
        type: HalPin.Float
        direction: HalPin.In
    }


    Text {
        anchors.centerIn: parent
        text:  "Cmd-Vel: " + cmdVelPin.value.toFixed(2) + "\nFb-Vel: " + fbVelPin.value.toFixed(3)
        font.family: "Mono"
    }
}
Unfortunately, the CPU usage increased to about 30%. Theoretically, the update rate should no have increased so the rendering performance difference must be a result of using the QtQuickVcp components. Figuring out the exact source of the additional rendering overhead is something that I plan to do in the future.
Conclusion
For me, the project proves very useful as an example that QtQuick and QML can be used for this application.
Furthermore, the resulting tool allows writing QtQuickVcp UIs also for embedded projects that only feature a monochrome OLED display. This means it is now possible to write UIs for desktop, tablet and an OLED display using the same technology.
I hope you found this blog post useful and I'm looking forward to hearing your feedback.
Your Machine Koder